Table of contents
Open Table of contents
前期准备
- Google账号
- Astro站点
设置 Google Analytics
可以按照这些步骤设置 Google Analytics
(1)创建账号,按画面的指导操作完成后,应该会看到类似这样的界面

(2)谷歌分析中的“创建账户”页面,接着按指引信息填写各种信息,最终我们可以拿到“集成代码”
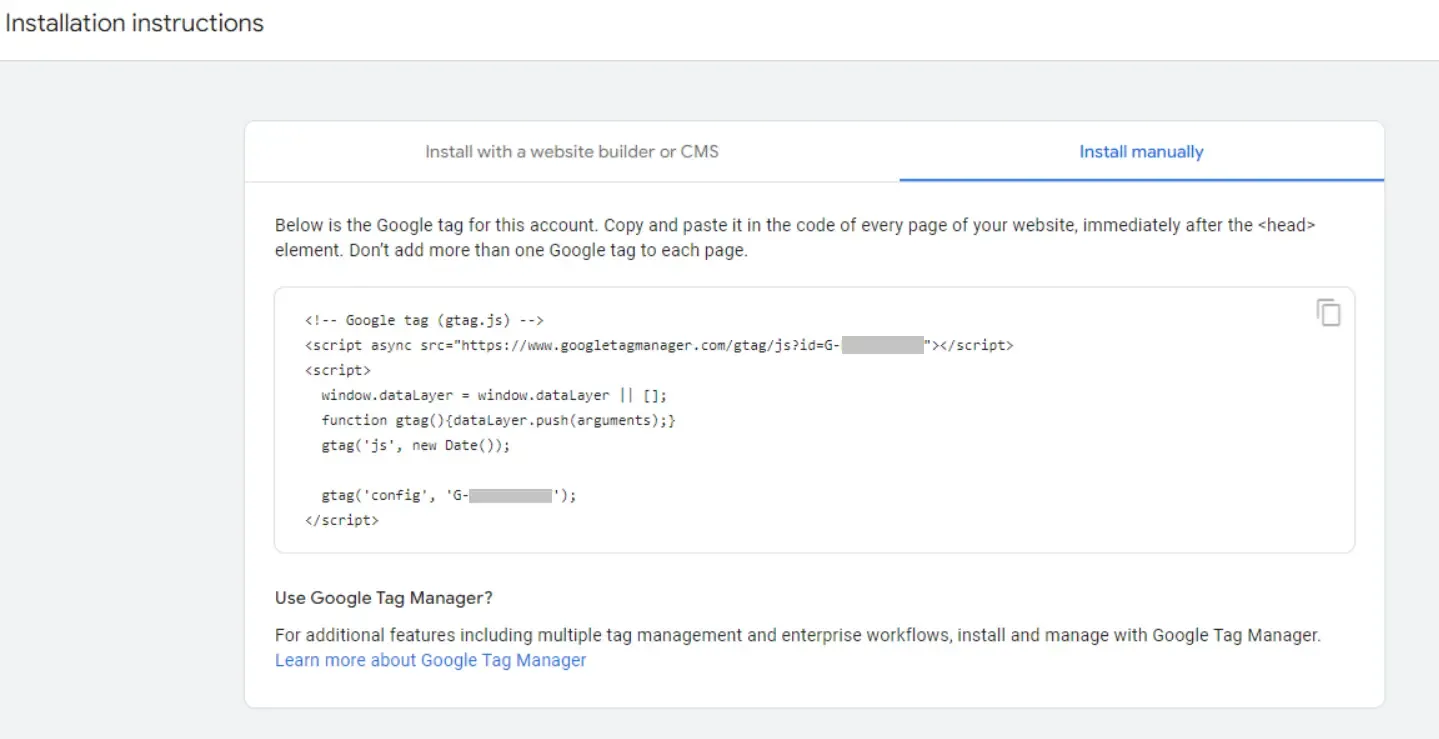
记下这个 G-XXXXXXXXXX 的 ID,我们将在下一步用到它。
将Google Analytics集成码添加到Astro站点
Step #1 安装 Partytown
打开终端,在项目根目录下执行:
npm install @astrojs/partytownStep #2 配置 Partytown
Partytown 安装完成后,在 astro.config.ts(或 astro.config.mjs)中进行配置:
import { SITE } from "./src/config"; // 站点配置文件,包含 website 等信息
import partytown from "@astrojs/partytown";

// https://astro.build/config
export default defineConfig({
  site: SITE.website,
  integrations: [
    sitemap({
      filter: page => SITE.showArchives || !page.endsWith("/archives"),
    }),
    partytown({
      config: {
        forward: ["dataLayer.push"], // 这行配置是确保 Google Analytics 能正常工作的关键
      },
    }),
  ]astro.config.ts
在上面的代码中,我们导入了 Partytown 库: import partytown from '@astrojs/partytown',然后,我们将这段代码添加到 integrations 对象上:
partytown({
  config: {
    forward: ["dataLayer.push"],
  },
});
代码中的其他内容都是随 Astro 项目一起生成的。
Step #3 将代码段添加到各个页面
接下来,我们需要将之前获取的 Google Analytics 跟踪代码添加到 Astro 站点中。
最方便的方式是使用 astro 的内置组件 <ViewTransitions /> 或直接在布局文件中注入。
推荐方式:在 src/layouts/BaseLayout.astro 或 src/layouts/Layout.astro 的 <head> 标签中添加以下代码:
---
// 从环境变量中Google Analytics ID,更安全
const GA_MEASUREMENT_ID = import.meta.env.PUBLIC_GA_MEASUREMENT_ID;
---

<head>
  <!-- 其他 head 内容 -->

  {
    GA_MEASUREMENT_ID && (
      <>
        <script
          is:inline
          async
          src={`https://www.googletagmanager.com/gtag/js?id=${GA_MEASUREMENT_ID}`}
        ></script>
        <script is:inline>
          window.dataLayer = window.dataLayer || [];
          function gtag() {
            dataLayer.push(arguments);
          }
          gtag('js', new Date());
          gtag('config', '${GA_MEASUREMENT_ID}');
        </script>
      </>
    )
  }
</head>
这里使用了 is:inline 指令,确保脚本在 HTML 中内联输出,避免被 Astro 处理导致 Partytown 无法正确代理
Step #4 设置环境变量
在项目根目录创建 .env 文件:
PUBLIC_GA_MEASUREMENT_ID=G-XXXXXXXXXX.env然后在 astro.config.ts 中声明该环境变量
import { defineConfig, envField } from "astro/config";

export default defineConfig({
  // ...
  env: {
    schema: {
      PUBLIC_GA_MEASUREMENT_ID: envField.string({
        access: "public",
        context: "client",
        optional: true,
      }),
    },
  },
});astro.config.ts
这样,我们的 Astro 站点就成功集成了 Google Analytics
验证是否生效
部署站点后,打开浏览器的开发者工具(F12),切换到 Network(网络) 选项卡,刷新页面,你应该能看到发往
www.googletagmanager.com 或 google-analytics.com 的请求。
(完)
如果这篇文章刚好帮到了你,欢迎请我喝杯咖啡!